
What you’ll learn in this chapter
Estimated reading time: 25-35 minutes | Difficulty: ★☆☆☆☆
If you search the web, you’ll find no shortage of Git tutorials. So why pick up a book?
Chances are, you’ve already tried learning Git from online resources and hit a wall. Maybe you found it confusing. Maybe you didn’t see why you needed it. Maybe you got lost in a sea of commands and gave up.
You’re not alone. The author failed to learn Git twice before it finally clicked. The first time, it seemed overly complicated with no clear payoff. The second time, even with real project deadlines as motivation, the fragmented online tutorials still weren’t enough.
That experience is exactly why this book exists. Having stumbled through those same frustrations, we know precisely where learners get stuck and what finally makes things click. And here’s the encouraging part: once it clicks, you’ll wonder why it ever seemed hard.
There are two main reasons people struggle with Git:
First, the intimidation of the command line. A black screen with a blinking cursor gives you no visual feedback. You can’t see what’s happening, so you try to memorize commands, and when you can’t remember them all, you give up.
Second, fragmented online resources. Most tutorials assume you already know enough to search for the right thing. But if you don’t know what commands exist, you can’t even form the right question. You end up discovering features months later, thinking, “Wait, Git can do that?”
Git is a fundamental skill for any developer. Engineers who use Git fluently are immediately recognized as professionals. In the AI era, this hasn’t changed. If anything, the importance of Git has only grown as AI tools become a bigger part of the development workflow.
This book is designed to overcome both of those stumbling blocks. We use abundant diagrams to visualize what’s happening behind the command line. And instead of scattered tips, we provide a systematic path from Git’s big picture down to individual commands. Rather than memorizing commands, you’ll understand why things work the way they do, and that understanding will make Git feel natural.
“Why Git?” is a two-volume series that takes you from fundamentals to professional practice.
Vol. I: Foundations (this book)
Learn Git operations in your local environment from the ground up. Even if you’ve never used Git or the command line, the step-by-step explanations will build your skills steadily.
| Chapter | Content |
|---|---|
| Chapter 1 | Why Git Matters in the AI Era |
| Chapter 2 | Understanding Git’s Core Concepts |
| Chapter 3 | Setting Up Your Development Environment |
| Chapter 4 | Getting Comfortable with the Terminal |
| Chapter 5 | Git Commands: A Practical Guide |
| Chapter 6 | Hands-On Git Practice in a Local Repository |
| Chapter 7 | Integrating AI Agents with Git |
By the end of this book, you’ll be able to use Git confidently in your own projects.
Vol. II: Mastery
Learn GitHub integration, conflict resolution, AI tool workflows, team collaboration, and CI/CD pipelines.
| Chapter | Content |
|---|---|
| Chapter 1 | Introduction to Vol. II and GitHub Setup |
| Chapter 2 | Working with Remote Repositories |
| Chapter 3 | Development Flow Rules |
| Chapter 4 | Mastering Conflict Resolution |
| Chapter 5 | Integrating AI Tools with Git |
| Chapter 6 | Thriving in Team Development |
| Chapter 7 | Automating with GitHub Actions |
| Chapter 8 | Troubleshooting and Advanced Techniques |
| Chapter 9 | Going Further – Worktrees and Git LFS |
After Vol. II, you’ll have the Git skills to contribute effectively to any team.
We recommend reading from Chapter 1 onward in order. Each chapter builds on the previous one, so jumping ahead may leave gaps in understanding.
That said, if you already know Git basics, feel free to skip to the chapters you need. Each chapter opens with a “What you’ll learn” summary to help you decide.
Each section heading includes a “Back to Table of Contents” button. When you want to review a topic or look up a specific command, you can quickly jump back to the table of contents and navigate to the right section.
The world of programming has changed dramatically. Beyond established tools like GitHub Copilot, Claude Code, and ChatGPT, new AI development tools keep emerging: Cursor, Devin, Windsurf, Cline, and Google’s Antigravity, to name a few. If you’ve picked up this book, you’re likely already using some of these tools or planning to start.
AI tools are fundamentally reshaping how we build software.
Traditionally, programmers spent most of their time writing code. Now, the role is shifting toward directing AI to build what you need. “Prompt engineering” has become a skill in its own right, reflecting how much the job has changed.
This shift has dramatically lowered the barrier to programming. With AI assistance, even beginners can build functional applications. But it has also introduced new challenges.
AI has opened the door for people who never considered themselves programmers. Marketers, designers, founders – regardless of job title, “building with AI” is now a real option.
But many non-engineers who start building with AI hit a wall at a certain point.
They can generate code. They can get things to work. But as the project grows, things start going wrong. Files become disorganized. Something that worked yesterday breaks today. Trying to collaborate with others creates chaos.
The root cause is simple: they don’t know the unwritten rules that professional developers take for granted.
Best practices refined over decades of software development, industry-standard tools, team collaboration protocols – these are absorbed naturally through engineering experience, but people who enter development through AI never encounter them.
The most important of these is Git.
For professional developers, Git is like oxygen. It’s so fundamental that it’s assumed. But if Git is a new word to you, you’re in the right place. Git isn’t just a tool – it’s your entry ticket to professional development. Whether you know it or not will fundamentally change your development experience going forward.
This book teaches you Git’s foundations and, just as importantly, the why behind everything. When you’re ready to work as a professional developer, you’ll already have industry-standard practices under your belt.
So what exactly is Git?
In one sentence: Git is a tool that records and manages the history of changes to your files.
Normally, when you save a file, you overwrite the previous version. But what if you want to go back to yesterday’s version? Once you’ve overwritten it, it’s gone.
With Git, you can take a “snapshot” of your files at any point in time. You can always return to a previous state, and every snapshot records who changed what, when, and why.
Think of it like save points in a video game. Save before the boss fight, and if you lose, you can try again as many times as you need. Git is essentially save points for your code.
You might be thinking, “Can’t I manage file history with Dropbox or Google Drive?”
Here’s the thing: AI output varies every time, and it rarely produces perfect code on the first try. Working with AI means constant iteration.
Imagine this scenario. You ask AI to “build a login feature.”
This cycle is the reality of AI-assisted development. And here’s where the problem surfaces: “It was working at attempt 2… how do I get back to that state?”
With Git, you can record each stage as a “commit.” Want to go back to attempt 2? One command and you’re there. You can instantly restore the working state before things went off track.
In other words, Git is a safety net for the trial-and-error process of working with AI. The more powerful AI gets, the more iterations you’ll go through. That’s exactly why Git’s value keeps growing.
3 Reasons Git Matters in the AI Era
The more powerful AI becomes, the more important Git is for managing its output.
AI is powerful, but without proper management, it comes with real pitfalls. Let’s look at three risks you should watch for when developing with AI.
Have you ever asked AI to “change the button color” and discovered it rewrote unrelated files?
AI doesn’t always limit itself to what you asked. It sometimes makes “helpful” changes to other parts of your code. These well-intentioned modifications can introduce unexpected bugs. In 2025, there were even reported incidents of AI accidentally deleting databases.
With Git: git diff lets you see exactly
what changed at a glance. If something was modified that shouldn’t have
been, you can easily revert just that part.
You deploy code that “works” – only to discover it has security vulnerabilities. This happens more often than you’d think.
Research suggests that roughly half of AI-generated code has issues flagged in security testing. AI is great at writing code that runs, but it often falls short on writing code that’s secure or maintainable over time.
With Git: You can trace the full change history during code review. Knowing when each change was introduced makes it much easier to pinpoint the source of problems.
“It was working a minute ago…” – a phrase you’ll hear constantly in AI-assisted development.
Even with the same prompt, AI generates slightly different code each time. If you want to get back to “that version that worked,” you can’t just re-run the same prompt. And trying to manually reconstruct a previous state from memory often makes things worse.
With Git: You save working states as commits. Even
if you’ve gone down the wrong path, a single git checkout
gets you back to a state you know works.

3 Habits for Working Safely with AI-Generated Code
AI is powerful but not infallible. These practices will keep you in control:
git diff
to check what changed before accepting AI’s output.Make this cycle a habit, and you’ll always have a working state to fall back to, no matter how far off track an AI session goes.
app_final.js, app_final2.js,
app_REALLY_final.js – sound familiar?
Without version control, this is what happens. Which file is the latest? What’s different between them? When were the changes made? Why were they made? Nobody remembers.
In a team, this chaos multiplies with every person involved. “Is Alex’s final version the right one, or is it the one Jamie fixed?” Time that should be spent writing code gets eaten up coordinating over chat and email.

This is especially painful in AI-assisted development: “It was just working…”
You ask AI for a fix. It breaks something else. You ask for another fix. Things get worse. Before you know it, you’re miles from a working state.
You want to get back to “the version that worked,” but with file names alone, you can’t identify which point that was. Trying to manually revert from memory often introduces new bugs.
These are exactly the problems that Git solves, as we’ll see in the next section.
So far, we’ve seen the risks of AI code generation and the importance of version control. The question is: how do AI and Git fit together?
AI plays offense. It generates code at high speed, constantly proposing new ideas. “How about this approach?” “Should we add this feature too?” It’s always pushing forward.
Git plays defense. It reliably records everything AI produces and ensures you can always get back to a known-good state. It guards the checkpoint that says “everything was working up to here.”
This division of labor is what makes it safe to experiment with AI’s suggestions. If something goes wrong, just fall back to the safe point Git is protecting. You need both offense and defense to move forward with confidence.
In practice, the cycle looks like this:
Repeat. AI pushes forward, and when it works, Git locks in the progress. When it doesn’t, Git takes you back to your last good state so you can try again.
Master this workflow and you’ll never get lost in AI-assisted development. This book teaches you how to put it into practice.

This book (Vol. I: Foundations) is a practical guide to learning Git from scratch. Across six chapters, you’ll progress from “What is Git?” all the way to hands-on practice in a local environment.
Chapter 1 (this chapter)
Understand why Git matters in the AI era. You’ll see how AI tools have transformed development, learn from real failure scenarios, grasp the importance of version control, and discover how Git and AI complement each other.
Chapter 2: Understanding Git’s Core Concepts
Learn Git-specific concepts like repositories, commits, and branches with clear, beginner-friendly explanations. Key sticking points like “local vs. remote repositories” and “commits add history, they don’t overwrite” get special attention.
Chapter 3: Setting Up Your Development Environment
Install and configure Git and VS Code. This chapter covers the practical setup you need, using free tools, with troubleshooting for common issues.
Chapter 4: Getting Comfortable with the Terminal
Learn the terminal (command line) basics you’ll need for Git. What the terminal is, GUI vs. CLI, essential commands (ls, cd, mkdir, pwd) – by the end, you’ll be comfortable typing commands with confidence.
Chapter 5: Git Commands: A Practical Guide
A systematic guide to the Git commands you’ll use in practice: init, status, add, commit, log, diff, branch, switch, merge, restore, and more. Each command includes its purpose, options, and real examples. You don’t need to memorize them now – you’ll learn by doing.
Chapter 6: Hands-On Git Practice in a Local Repository
Hands-on exercises that follow a real development workflow. From creating a repository to developing features, fixing bugs, and managing parallel branches – you’ll apply everything from Chapter 5 in realistic scenarios.
By the end of this book, you’ll be able to:
Once you’ve finished this book, Vol. II: Mastery is the natural next step. It covers GitHub integration, AI tool workflows, and team collaboration in practice.
Plan for roughly 2-3 weeks of study time. Of course, your pace may vary based on experience, but the book is structured so that every step moves you forward.
Development in the AI era is full of unprecedented possibilities. With AI tools at your side, even beginners can produce remarkably high-quality code. But to get the most out of that power, you need a solid foundation. That foundation is Git.
Through this book, you’ll develop a fearless approach to development. Try AI’s suggestions aggressively, roll back if they don’t work, lock in progress when they do, and move on to the next challenge. You’ll build the confidence to keep that cycle going.
Starting in the next chapter, we’ll dive into the specifics of Git. Chapter 2 will give you a solid understanding of Git’s core concepts.

Three Mindsets to Keep You From Getting Stuck
“Git is hard” and “I’ve failed at it multiple times” are things we hear all the time. The truth is, people who give up on Git tend to share common patterns. Keep these three things in mind, and your chances of success go up dramatically.
1. Don’t aim for perfection
You don’t need to memorize every command. In practice, about 10 commands cover 90% of your needs. This book focuses on the commands you’ll actually use. You can learn the rest when you need them.
2. Don’t fear mistakes
“What if I commit the wrong thing?” “What if I lose data?” – these fears paralyze a lot of beginners. But Git is designed to let you undo mistakes. This book covers recovery techniques thoroughly, so experiment freely.
3. Use GUI tools too
If the terminal feels intimidating, tools like VS Code and GitHub Desktop let you work visually. There’s nothing wrong with starting with a GUI and gradually moving to commands. This book covers both approaches.
In the AI era, Git is getting easier
AI tools like Claude Code and Aider can help you with Git commands. Tell them “I want to revert this file to its previous state” in plain English, and they’ll suggest the right command. Learning Git today is significantly easier than it was even a few years ago.
Getting stuck is a problem of approach, not ability. This book lays out a clear path to success. Let’s take it one step at a time.
This book includes many command examples. If the word “command” makes you tense up, take a breath. It’s going to be fine.
You don’t need to memorize anything right now. Every time a new command appears, we explain it step by step. The fastest way to learn isn’t memorization – it’s learning by doing.
Also, as we’ll discuss later, Git can be operated through buttons in editors like VS Code. However, since many operations can only be done via the command line, this book focuses on commands. It may feel unfamiliar at first, but with repetition, your fingers will start moving on their own.
Note that this book uses two types of commands: Git
commands and Bash commands. Git commands start
with git; Bash commands are everything else (general
terminal operations). Since this book’s focus is Git, we won’t go deep
into Bash, but Chapter 4 covers the essentials.
This section explains the notation conventions used throughout the book. Understanding these now will make the rest of your learning smooth.
A terminal (also called a console or command line) is a tool where you type text instructions for your computer. The default terminal varies by operating system.
| OS | Default Terminal | Prompt Symbol |
|---|---|---|
| Mac | Terminal.app (zsh) | % |
| Windows | PowerShell / Command Prompt | > |
| Linux | Various terminals (bash) | $ |
Important note for Windows users: This book assumes you’re using “Git Bash” on Windows. Git Bash is a bash shell that gets installed along with Git, giving you the same commands available on Mac and Linux.
Some commands in this book (like ls and
cat) may not work or may produce different output in
PowerShell or Command Prompt. To follow along exactly, use Git Bash.
In this book, terminal operations are displayed in dark background boxes like this:
$ git status
On branch main
nothing to commit, working tree cleanAn important detail in terminal displays is the prompt symbol at the beginning of each line. It varies depending on your environment.
| Environment | Prompt Display |
|---|---|
| Git Bash / Linux | $ |
| Mac (zsh) | % |
| Windows PowerShell | PS C:\> |
| Windows Command Prompt | C:\> |
This book uses $ throughout. If your
environment shows % or >, simply type the
command that appears after the $.
$ git status
On branch main
Lines with $: Commands you type (don’t
type the $ itself) Lines without
$: Output from the computer (the result)
So in the example above, you type git status, and the
computer responds with On branch main.
Command output in this book is shown in English. If your system is configured for a different language, you may see translated output messages.
# English (as shown in this book)
$ git status
On branch main
nothing to commit, working tree clean
As long as the meaning is the same, there’s no difference in behavior. You can follow along regardless of your system’s language setting.
#) MeanThe # symbol in code indicates a “comment.” Everything
from # to the end of that line is treated
as a comment and ignored by the computer. You don’t need to type it.
# This entire line is a comment (don't type it)
$ git add index.html # <- only this part is a comment#, so the entire
line is a commentgit add index.html is the
command; everything after # is a commentIn the example above, you only type
git add index.html.
The commands in this book fall into two main categories.
Any command starting with git is a Git command. These
perform version control operations.
$ git init          # Initialize a Git repository
$ git add .         # Stage files
$ git commit -m "message"  # Create a commit
$ git push          # Send to remote
$ git pull # Fetch from remoteCommands that don’t start with git are general shell
commands. These handle file operations and system tasks.
$ ls                # List files
$ cd my-project     # Change directory
$ cat index.html    # Display file contents
$ mkdir new-folder  # Create a new folder
These aren’t directly related to Git, but you’ll use them frequently during development. They’ll appear in this book whenever we need to check the state of things.
Commands can take “options” that modify their behavior.
$ git log --oneline    # Show history, one line per commit
$ git commit -m "message"  # Specify the commit message
$ ls -la               # List all files with details
Single hyphen (-): Short option (e.g.,
-m, -a) Double hyphen
(--): Long option (e.g., --oneline,
--all)
Short options use a single character; long options use a word. Some
options have both short and long forms (e.g., -m and
--message mean the same thing).
In this book, values you need to replace are shown in
<> brackets.
$ git commit -m "<message>"
$ git switch <branch-name>
$ git clone <repository-url>
In the examples above, replace <message> with your
actual message (e.g., "Initial commit"). Don’t type the
<> brackets themselves.
When a command is long, it may be broken across lines with
\ (backslash).
$ git log --oneline \
    --graph \
    --all
This is actually a single command. The \ means
“continues on the next line.” You’ll get the same result typing
everything on one line.
When output is long, it may be shortened with ....
$ git log
commit a1b2c3d4e5f6a7b8...
Author: Your Name <email@example.com>
Date:   Mon Jan 15 10:00:00 2025 +0900

    Initial commit
...| Notation | Meaning |
|---|---|
$ |
A command you type (don’t type the $) |
# |
A comment (explanation only, don’t type it) |
<value> |
Replace with an actual value |
-x |
Short option |
--option |
Long option |
\ |
Command continues on the next line |
... |
Output has been truncated |
Tips for Getting Comfortable with Commands
Don’t try to “memorize” commands at first. Even if it’s slower, type each command by hand instead of copying and pasting. Your fingers won’t learn from the clipboard.
git status, git add,
git commit… type them enough times and they’ll become
muscle memory, just like touch typing.
Once you’re comfortable with the basics, tools like Claude Code (covered in Vol. II) can be a great complement. Just say “I want to commit this file” and it’ll suggest the right command. But having the fundamentals down first makes it much easier to understand what the AI is suggesting.
In the previous section, we mentioned that Windows users should use Git Bash. Here’s how to open it.
There are several ways to open Git Bash, but opening it from VS Code (Visual Studio Code) is recommended. VS Code is covered in detail in Chapter 3, but it’s the most widely used code editor among developers.
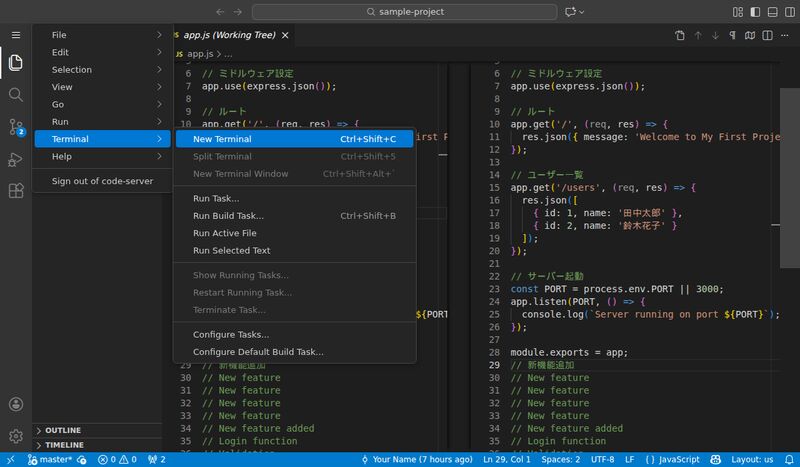
You can also use the keyboard shortcut (Windows: Ctrl+`,
Mac: Cmd+`).
When the terminal opens, a panel appears at the bottom of the screen where you can type commands.
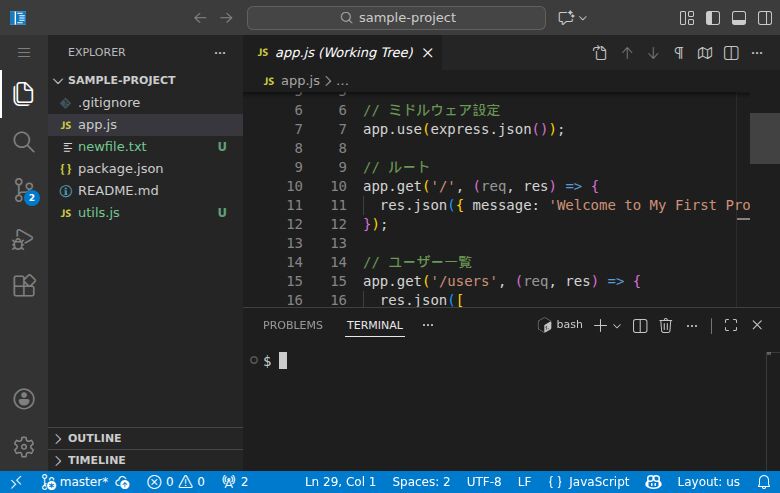
The image above shows a simple $ prompt, but your
environment might display something like
user@PC-name ~/project $ with your username and folder
path. Git Bash may also show colorized text. Different displays are
perfectly normal. As long as you can type after $ or
%, you’re all set.
Type a command after $ and press Enter (Return) to run
it. Many commands produce no output on success – the next prompt simply
appears. If that feels unsettling, remember: no error message means it
worked. No news is good news.
Windows users: The first time you open a terminal, it might default to PowerShell. If so, click the dropdown arrow next to the “+” button at the top right of the terminal panel and select “Git Bash.”
With that, you can use a terminal (Git Bash) right inside VS Code. Your project folder automatically becomes the current directory, so you can start running Git commands immediately.
Why Open Git Bash from VS Code?
If you’re tired of selecting Git Bash every time, you can make it the default terminal in VS Code.
Ctrl+Shift+P to open the Command PaletteNow every new terminal will automatically open Git Bash.
Mac and Linux Users
On Mac and Linux, the default terminal (zsh or bash) works out of the box. No special setup is needed. All commands in this book will run as-is.
In this chapter, you learned why Git matters in the AI era. Git isn’t just a file management tool – it’s the “defense” that keeps your AI-assisted development safe and under control.
$ is the prompt,
# is a comment, and <> indicates a
placeholder.What is Git’s primary purpose?
Which statement correctly describes why Git matters in the AI era?
How do AI and Git divide responsibilities?
In this book’s terminal examples, what does the $ symbol
indicate?
In command examples, what are the parts starting with
#?
Next chapter preview: In Chapter 2, you’ll learn Git’s core concepts: repositories, commits, and branches. Understanding these concepts will give you a clear picture of how Git works under the hood.
What you’ll learn in this chapter
Estimated reading time: 20-30 minutes | Difficulty: ★★☆☆☆
“The code was working yesterday, but now it’s broken.” “I want to undo that change, but I can’t remember what I modified.” You’ve been adding a new feature, rewriting code as you go, and suddenly the parts that used to work are broken too. Mashing Ctrl+Z won’t save you – it’s already too late. If you’ve ever written code, you’ve lived this nightmare.
In the age of AI coding, this problem is even worse. AI generates and modifies large amounts of code at once, making it nearly impossible for a human to track “what changed” and “what it looked like before.” That’s exactly why version control systems are more important now than ever.
A version control system automatically records every change made to your files, letting you jump back to any point in time. Who (or which AI) changed what, when, in which file, and how – it’s all recorded and available whenever you need it. If AI-generated code causes a problem, you can instantly restore “the way things were.” For any developer working alongside AI, this is a lifeline.
In modern software development, version control is as fundamental as electricity or running water. You simply won’t find a professional development team that doesn’t use it. And the global standard is Git.
One of Git’s most powerful features is the “diff” view. Below is an illustration of what a Git diff looks like in VS Code.

The left side shows the code before the change, and the right side shows it after. Deleted lines are highlighted in red, and added lines in green. In this example, a traditional for loop has been refactored into a more concise forEach call.
With this diff view, whether code was generated by AI or written by you at 2 AM, you can see exactly what changed at a glance. When something breaks, this view makes it dramatically faster to pinpoint the cause. And if needed, you can revert the change with a single click.
This is the core benefit of using Git. It makes changes visible and gives you the confidence to keep improving your code, knowing you can always go back.
“OK, so I can see the diff. But is reverting actually easy?” You might be surprised. With VS Code and Git, you can revert changes with a single click right from the diff view.

When you’re reviewing changes in the diff view, you’ll see arrow and plus buttons next to each change block. Click the arrow button, and that specific change is reverted – back to the original code. No commands to memorize. And you can selectively revert individual change blocks rather than the entire file.
Say you had AI write some code, but one part isn’t working right. You revert just the problematic section with one click, keep the rest, and try a different approach. You can experiment freely and redo things as many times as you want – that’s what a Git-powered development environment gives you.
Git was created in April 2005 by Linus Torvalds, the creator of Linux. The story behind it is quite dramatic.
At the time, the Linux kernel – one of the world’s largest open-source projects – used a commercial version control system called BitKeeper. BitKeeper was distributed and high-performance, but when a Linux developer reverse-engineered its protocol, the free license was revoked. Thousands of Linux kernel developers suddenly lost their development tool.
Torvalds evaluated existing version control systems like CVS and Subversion, but none met his requirements. Here’s what he needed:
“I took CVS as an example of what not to do,” Torvalds later said. “If in doubt, do the exact opposite of what CVS does.”
Remarkably, Torvalds built the first version of Git in just 10 days. But this wasn’t a sudden impulse – he’d spent the previous four months designing a system to surpass BitKeeper. On April 7, 2005, the first Git commit was made, and that commit itself was recorded using Git.
Version control systems come in two flavors: centralized and distributed. Git is distributed. Understanding this distinction will help everything else about Git click into place.
In a centralized system, the complete project history lives only on the server. Developers have just the latest version of the files on their machines.
This means if the server goes down, everyone stops working. Want to view history, revert to an older version, or create a branch? You need a connection to the server. On an unreliable network, productivity takes a serious hit.
In a distributed system, everyone has the complete
history. When you git clone a repository, every
commit from the very first to the latest is copied to your machine.
So even if the server (GitHub, etc.) goes down, you can keep working locally. Commits, branch creation, history searches – all happen on your machine without a network connection. You only need the network when sharing changes with others.

This difference directly impacts your day-to-day development experience. With Git, operations like “let me try something” or “let me dig through the history” are effortless. Branch creation is instant. History searches have zero network latency. This responsiveness is one of the key reasons Git is used worldwide.
Today, Git is a “must-have” skill for developers. It’s not uncommon to see “Git experience required” on job listings. According to the Stack Overflow Developer Survey, over 93% of professional developers use Git as their version control system.
But Git wasn’t always popular. For several years after its birth in 2005, it was seen as “an obscure tool for Linux kernel developers” and was slow to gain traction in the wider developer community.
What changed everything was GitHub, launched in 2008. GitHub combined Git repository hosting with features like pull requests, issue tracking, and code review – all accessible through a web interface.
The game-changer was making open-source projects free to host. Individual developers and open-source communities flocked to GitHub, and enterprises followed. In 2018, Microsoft acquired GitHub for $7.5 billion. Today, with GitHub, GitLab, and Bitbucket, the Git-centric development ecosystem is firmly established.
Git’s continued dominance is backed by solid technical reasons:
Why Git Remains Dominant After 20 Years
The software industry is notorious for rapid technology churn. Last year’s hot framework is this year’s legacy code. Yet Git, born in 2005, continues to dominate with no serious challenger in sight. Why?
The answer lies in the fundamental problem Git solves. Git isn’t just a “file backup tool.” It’s a system that completely tracks who changed what, when, and why.
This “complete tracking of change history” doesn’t lose value as technology evolves. In fact, in the AI era, it’s become even more critical.
With AI coding assistants now widespread, developers need to distinguish between AI-generated code and human-written code. When a bug surfaces, you need to determine whether it originated from an AI suggestion or a human decision. Without that ability, root-cause analysis becomes extremely difficult.
Even more concerning is the problem of AI making unexpected changes. Developer communities report cases like “70 files were modified, and a small unintended edit was buried in there” and “the AI rewrote files without asking.” AI sometimes tries to “improve” code you didn’t ask it to touch, and if you don’t catch those changes, they could end up in production.
This is where Git truly shines. Stage your current state with
git add before letting AI generate code, then use
git diff to review every change. Even when 70 files are
modified, the diff instantly reveals unintended changes. If something
looks wrong, git checkout or git restore takes
you back to the previous state immediately.
Git’s commit history is precisely the solution to this problem. Commit messages like “Accept AI suggestion for error handling,” “Manual refactoring of auth module,” and “Security fix for AI-generated code” create a clear record of each change’s origin and rationale. Experienced developers follow rules like “never let AI work directly on main” and “commit frequently.”
Git’s distributed architecture is also increasingly valuable in a world dependent on cloud services. Even if GitHub or GitLab goes down, every developer has the complete history locally – an important factor for business continuity.
Technologies change, but the fundamental need to “track changes and go back to any previous state” doesn’t. It’s safe to say Git will still be in use 20 years from now.
Git comes with a lot of its own terminology. “Repository,” “commit,” “branch,” “staging area” – if you’re hearing these for the first time, it can feel overwhelming. Don’t worry. In this section, you’ll get a bird’s-eye view of Git’s world and its key terms all at once.
Working with Git revolves around “four locations” and “the operations that connect them.” Getting this big picture in your head first will make everything that follows much easier to understand.

Once you understand the relationship between the “locations” and “operations” in this diagram, you’ve grasped about 80% of Git. We’ll cover each one in detail from section 2-3 onward, so for now, just get a sense of the overall flow.
The table below lists the terms you’ll learn in detail throughout this chapter. For now, just scan through them. As you read each section, the concepts will start to click.
| Term | One-Line Description | Details |
|---|---|---|
| Working tree | Where you actually edit files | 2-6 |
| Staging area | Where you prepare changes for a commit | 2-6 |
| Local repository | The history stored on your own machine | 2-3 |
| Remote repository | A shared repository on a server | 2-3 |
| Term | One-Line Description | Details |
|---|---|---|
| Commit | A snapshot recording the project’s state | 2-4 |
| Branch | A pointer marking a point of divergence | 2-5 |
| HEAD | A marker showing where you currently are | 2-5 |
| Commit hash | A unique ID identifying each commit | 2-4 |
| Term | One-Line Description | Details |
|---|---|---|
| clone | Copy a remote repository to your machine | 2-3 |
| add | Stage changes for the next commit | 2-6 |
| commit | Record staged changes in the history | 2-4 |
| push | Send local changes to the remote | 2-3 |
| pull | Fetch remote changes to your local | 2-3 |
Later chapters will introduce these additional terms:
| Term | One-Line Description | Details |
|---|---|---|
| Merge | Combine multiple branches | Chapter 6 |
| Pull request | Request a review of your changes | Chapter 9 |
| Conflict | When changes collide | Chapter 10 |
| Rebase | Reorganize commit history | Chapter 10 |
| Stash | Temporarily set aside your work | Chapter 10 |
We recommend reading this chapter from top to bottom. Each section builds on the previous one, but if you get lost on a term, come back to this section as a reference.
There’s also a “Glossary” box at the end of the chapter with all terms summarized in a table for quick lookup.
Now, let’s dive into each concept in detail.
One of the first concepts that trips up Git beginners is the “repository.” Specifically, understanding that there are two kinds – local and remote – is the first step to mastering Git.
Let’s take a closer look at the diagram from section 2-2.
A Git workflow consists of “four locations” and “four operations.”
Four Locations
Four Core Operations
Once you understand this flow, you’ve grasped about 80% of Git. Let’s look at each element in detail.
A repository is where your project’s files and their complete change history are stored. Unlike a regular folder, it includes a record of every change – who changed what, and when.
The repository is physically stored in a hidden .git
folder inside your project directory. This folder contains commit
history, branch information, configuration files, and everything else
Git needs to operate.
To turn an ordinary folder into a Git repository, you run the
git init command. Let’s see what actually happens:
# An ordinary folder
$ ls -la my-project/
drwxr-xr-x  3 user  staff   96 Jan 15 10:00 .
drwxr-xr-x  5 user  staff  160 Jan 15 10:00 ..
-rw-r--r--  1 user  staff  100 Jan 15 10:00 index.html

# Run git init
$ cd my-project && git init
Initialized empty Git repository in /Users/user/my-project/.git/

# A .git folder has been added
$ ls -la
drwxr-xr-x  4 user  staff  128 Jan 15 10:00 .
drwxr-xr-x  5 user  staff  160 Jan 15 10:00 ..
drwxr-xr-x 12 user  staff  384 Jan 15 10:00 .git  <- This was added
-rw-r--r--  1 user  staff  100 Jan 15 10:00 index.html
This .git folder is the repository. Whether or not this
folder exists is what distinguishes a “regular folder” from a “Git
repository.”
.git FolderPeeking inside the .git folder reveals how Git manages
its data:
$ ls .git/
HEAD        # Records which branch you're currently on
config      # Configuration for this repository
objects/    # Actual data for commits and files (stored compressed)
refs/       # Branch and tag information
hooks/      # Auto-run scripts (advanced usage)
The critical thing to understand is that deleting the
.git folder destroys all history. Your files will
remain, but the change history will be completely lost. Conversely, as
long as the .git folder exists, you can restore any past
state of your project.
A local repository exists on your own computer.
Characteristics - Lives on your machine and is
invisible to others - Works without an internet connection - A private
space for experimentation and testing - Created with the
git init command
With a local repository, you can make changes, commit, create branches, and perform most Git operations without ever going online. You can review past history and develop new features, all completely offline.
A remote repository lives on a server like GitHub or GitLab.
Characteristics - Hosted on a server accessible over
the internet - A shared space for team collaboration - Doubles as a
backup - Can be copied locally with the git clone
command
The remote repository is the hub of team collaboration. Each team member works in their own local repository and pushes completed changes to the remote, sharing their work with the rest of the team.

Understanding the Difference Between Git and GitHub
A common source of confusion for beginners is the difference between “Git” and “GitHub.”
Think of it this way: Git is like Microsoft Word (the software), and GitHub is like Google Drive (the cloud service). You can use Git entirely on your local machine, but to share your work with a team, you need a hosting service like GitHub (or GitLab, or Bitbucket).
There are three fundamental operations for moving data between local and remote:
| Operation | Command | Description |
|---|---|---|
| Clone | git clone |
Copy a remote repository to your local machine |
| Push | git push |
Send local changes to the remote |
| Pull | git pull |
Fetch remote changes to your local |
For solo development, you’ll primarily use the remote repository as a backup. For team development, it serves as the central hub for integrating everyone’s changes.
The most important concept in Git is the “commit.” A commit works fundamentally differently from a regular file save.
Regular “saving” and Git “committing” serve different purposes. You don’t commit instead of saving – you save, and then commit. They work together.
File saving (Ctrl+S / Cmd+S) is still necessary
When you’re working in your editor and press Ctrl+S to save, that hasn’t changed. You still need to save for your file changes to take effect. But saving is an “overwrite” – each save replaces the previous state. You can undo with Ctrl+Z while the editor is open, but once you close it, that undo history is gone.
A commit creates a “history point”
A Git commit is a separate operation from saving. You run it whenever you think, “I want to record this current state in history.” When you commit, the entire project’s state at that moment is stored as a “history point.”
Create commit A, commit B, commit C… at whatever pace you like, and you can return to any of those points at any time. Close your editor, restart your computer, come back a year later – it doesn’t matter. The state at each commit is permanently preserved and always accessible.
Here’s the workflow:
Saving “updates the file.” Committing “creates a history point.” Combining the two gives you the confidence that you can always go back.

The diagram makes it clear. With overwrite saving, previous versions are lost one after another. With Git, every commit is preserved, and you can move to any point in time simply by moving HEAD.
Commits Are “Save Points Before the Boss Fight”
Think back to old-school RPGs. “Better save before the boss fight” – that was a habit every gamer developed. With a save point, no matter how badly the boss wiped out your party, you could restart from right there. But forget to save and get wiped out? Hours of progress, gone. That feeling of dread is something you never forget.
Programming is exactly the same. You try to add a new feature and break something that was working. You refactor and introduce a bug somewhere. AI suggests a bold change, you try it, and the entire project stops working. These “wipe-outs” happen to every developer.
Git commits are exactly those save points, and you can create them whenever you want. “This feature is done.” “Everything works up to this point.” “About to try a big change.” Commit at moments like these, and no matter what happens, you can get back to that state.
The sense of security – “I can try anything and always go back” – is remarkably powerful. You can make bold changes without fear. You can try experimental approaches. You can test AI suggestions freely. This psychological safety net unleashes developer creativity.
Experienced developers have a habit of committing frequently. They’ve learned through experience just how valuable those save points are. As you get comfortable with Git, you’ll feel this in your bones.
A Git commit is like a photograph of your entire project’s state at a specific moment in time.
Every time you commit, a “photo” of the entire project is taken. Every file is captured in that photo, and looking back at it later lets you perfectly reconstruct “what the project looked like at that moment.”
Here’s the key point. When you want to go back, you just pick a “photo.” Your entire project instantly switches to the state it was in when that photo was taken. It doesn’t matter if you have 100 files or 1,000. Pick one photo, and every file reverts to its content at that point.
This is the essence of Git’s “snapshot” approach. Rather than rewinding diffs one by one, you restore “the complete state at that point.” So even if AI modifies dozens of files, as long as you’ve committed, there’s nothing to fear.

Technically, Git records the “complete state” of files at each commit, not just the “diff.” However, internally it optimizes storage by saving unchanged files as references to the previous commit, so it doesn’t waste disk space.
Commits aren’t an abstract concept. You can see exactly how they’re
recorded using the git log command:
$ git log --oneline
a1b2c3d (HEAD -> main) Add user authentication
e4f5a6b Update header design
c7d8e9f Initial commit
Here’s what this output tells you:
a1b2c3d): A unique ID for the commit (the commit
hash)HEAD -> main: Shows where you
currently areTo visualize branch divergence and merges, add the
--graph option. This is one of the most commonly used
commands in practice:
$ git log --oneline --graph
* a1b2c3d (HEAD -> main) Merge branch 'feature/login'
|\
| * b2c3d4e Add login form validation
| * c3d4e5f Create login page
|/
* d4e5f6a Update README
* e5f6a7b Initial commit
Each * represents a commit, and the lines show the
branching and merging flow at a glance. This is especially useful when
multiple people are working on a project or when branches are heavily
used.
For more detailed information, drop the --oneline
flag:
$ git log
commit a1b2c3d4e5f6a7b8c9d0e1f2a3b4c5d6e7f8a9b0 (HEAD -> main)
Author: Your Name <email@example.com>
Date:   Mon Jan 15 14:30:00 2025 +0900

    Add user authentication feature
As you can see, “who,” “when,” and “what” is completely recorded.
As commits accumulate, you’ll sometimes want to check “what did the code look like back then?” With Git, it’s easy:
# View the file content as of two commits ago
$ git show c7d8e9f:index.html
<!DOCTYPE html>
<html>
<head><title>My App</title></head>
<body></body>
</html>

# Compare with the current file
$ cat index.html
<!DOCTYPE html>
<html>
<head><title>My App - User Dashboard</title></head>
<body>
  <header>Welcome, User!</header>
  <!-- Much more code has been added -->
</body>
</html>
You can view the content of any file at any point in history, whenever you want. This is Git’s “nothing is lost” property in action.
Each commit is assigned a unique identifier (ID) called a “commit hash” or “SHA-1 hash.”
Full hash:      a1b2c3d4e5f6a7b8c9d0e1f2a3b4c5d6e7f8a9b0 (40 characters)
Short form:     a1b2c3d (first 7 characters)
The commit hash is automatically calculated from the commit’s contents – the changed files, the author, the timestamp, the commit message, and more. Identical content always produces the same hash, and even a one-character difference produces a completely different hash.
Why the short form is enough
In practice, you don’t need to type all 40 characters. Git can identify commits from the short form:
# All of these refer to the same commit
$ git show a1b2c3d4e5f6a7b8c9d0e1f2a3b4c5d6e7f8a9b0
$ git show a1b2c3d4e5f6
$ git show a1b2c3d
Usually, the first 5-7 characters are enough to uniquely identify a commit within a project. Git automatically searches for commits matching the string you provide, and if there’s exactly one match, it uses it. If multiple commits share the same prefix, Git warns you it’s ambiguous, and you just add a character or two to resolve it.
Why collisions don’t happen
SHA-1 uses a 40-character hexadecimal space (160 bits), which provides approximately 10^48 possible combinations. Even the 7-character short form gives about 268 million possibilities, so for projects with thousands or even tens of thousands of commits, collisions are virtually impossible.
Even a massive project like the Linux kernel (over 1 million commits) maintains uniqueness with about 12 characters.
How to check commit hashes
# Check the hash of the most recent commit
$ git log --oneline -1
a1b2c3d feat: Add login feature

# Show the full hash
$ git log -1 --format="%H"
a1b2c3d4e5f6a7b8c9d0e1f2a3b4c5d6e7f8a9b0
git log --oneline automatically displays a short form of
appropriate length (typically 7 characters). You can copy this directly
and use it in other commands.
Every commit requires a “commit message” describing what changed and why.
Good commit message example
Add user authentication feature

- Implement login/logout functionality
- Use JWT for session management
- Hash passwords with bcrypt
Bad commit message example
fix stuffA commit message is a letter to your future self and your teammates. Months later, when you need to understand “why was this change made,” a specific, meaningful message will save you hours of detective work.
Commit Habits in the AI Era
When developing with AI tools, commit messages become even more important. When you adopt code suggested by AI, recording the reasoning in your commit message lets you later verify “why was this approach chosen?”
Example:
[AI] Accept Claude Code suggestion: improve error handling
This kind of record lets you distinguish AI-suggested code from human-written code and makes it far easier to investigate when problems arise.
In practice, you can also have AI tools like Claude Code review your changes and auto-generate appropriate commit messages. The AI analyzes the diff and summarizes the intent of the changes, producing more accurate and consistent messages. While this book won’t cover that technique in depth, Chapter 8 touches on integrating AI tools with Git.
Branches are one of Git’s most powerful features. But many beginners misunderstand what they actually are. Getting this concept right unlocks Git’s true potential.
Many beginners assume “creating a branch = copying the entire
project.” If you’ve ever managed versions by duplicating folders into
project_v1, project_v2, etc., this
misconception is understandable.
Misconception: Creating a branch copies your files
Reality: A branch is just a “pointer (reference)” to a commit

As the diagram shows, a branch is remarkably simple. Each branch just holds the information “which commit am I pointing to?” (a 40-character hash value). When you create a branch, no files are copied at all.
This design gives you several advantages:
This “lightweight branching” is what sets Git apart from other version control systems. Create branches freely, experiment, and delete them when you’re done. This flexibility is what powers modern development workflows.
The value of branches becomes clear with a concrete scenario.
Situation: You want to add a “dark mode” feature. But you’re not sure you can pull it off. It’ll take some trial and error, and you might fail.
The problem without branches:
If you start developing directly on main, your
trial-and-error could break working code. If you decide to abandon the
effort, you won’t know how far back to revert. In the worst case, you
might break features that were working perfectly fine.
The solution with branches:
Branches let you completely separate “finished code” from “work in progress.”
main branch            -> Completed, tested code
feature/dark-mode      -> Dark mode in development (not yet finished)
You do all your dark mode development on the
feature/dark-mode branch. No matter how much code you
change on this branch, main is completely unaffected. When
development is done and you’ve thoroughly tested everything, you merge
it into main.
What if it doesn’t work out? Just delete the branch.
main stays safe the entire time. Your existing features are
never at risk.
Let’s look at the specific commands and the state of the project after each operation:

The key insight is that when you run git switch to
change branches, the files in your folder actually
change. Same folder, different contents depending on the
branch. That’s the magic of Git.
switch vs. checkout – Which One to Use?
If you search online, you’ll find lots of references to
git checkout. In fact, git switch is a
relatively new command, added in 2019. Before that,
checkout was used for branch switching.
git switch main      # Modern syntax (recommended)
git checkout main    # Legacy syntax (still works)
checkout was a multi-purpose command that handled both
“branch switching” and “file restoration,” which was confusing for
beginners. So the functionality was split into switch (for
switching) and restore (for restoring). This book uses the
officially recommended switch, but checkout
does exactly the same thing.
For the record, even the author still types checkout out
of habit sometimes. Old habits die hard.
Branches let you completely isolate multiple streams of work. You can develop in parallel without any risk of one affecting another.
A branch is physically a small file containing a 40-character commit
hash. Look inside the .git/refs/heads/ directory, and
you’ll find a file for each branch:
$ cat .git/refs/heads/main
e5f6a7b8c9d0e1f2a3b4c5d6e7f8a9b0c1d2e3f4

$ cat .git/refs/heads/feature
d4e5f6a7b8c9d0e1f2a3b4c5d6e7f8a9b0c1d2e3
As you can see, the contents of a branch file is just a hash value. When you create a new commit, this hash is updated to point to the new commit.
When you switch branches (git switch), Git performs the
following steps:

The diagram above shows a typical branch flow. A feature
branch is created at commit B, then main and
feature progress independently, and eventually they’re
merged (combined).
Switching branches isn’t just a “display change.” The file contents actually change.
# On the feature/dark-mode branch, developing a new feature
$ git switch feature/dark-mode
Switched to branch 'feature/dark-mode'

$ cat styles.css
body {
  background: #1a1a1a;  /* Dark mode background */
  color: #ffffff;
}

# Switch to the main branch
$ git switch main
Switched to branch 'main'

$ cat styles.css
body {
  background: #ffffff;  /* Standard background */
  color: #333333;
}
The same file (styles.css) has different contents
depending on which branch you’re on. Git rewrites the files based on the
data stored in the .git folder.
This mechanism lets you manage multiple lines of development in a single project folder. No need to manually copy files or maintain multiple directories.
HEAD is a special pointer that shows “where you currently are.” Think of it as the “You Are Here” pin on a map app. When working with Git, it’s essential to always know where you are. HEAD serves that purpose.
Normally, HEAD points to a branch name, and that branch points to a commit – which determines your current working state. Understanding this “two-level reference” structure is key to mastering Git.

As the diagram shows, HEAD normally points to a “branch,” and the branch points to a “commit.” When you create a new commit, the current branch pointer automatically moves to the new commit. HEAD keeps pointing to the same branch, so it effectively follows along to the latest commit.
When you switch branches (git switch feature), HEAD
changes what it points to:
$ git switch main
Switched to branch 'main'
# HEAD -> main -> commit E

$ git switch feature
Switched to branch 'feature'
# HEAD -> feature -> commit D
Watch Out for Detached HEAD State
Normally, HEAD points to a branch. But it’s also possible to point HEAD directly at a specific commit. This is called “detached HEAD.”
# Checkout a commit hash directly
$ git checkout a1b2c3d
# or
$ git switch --detach a1b2c3d
This is useful for inspecting the contents of a past commit, but don’t create new commits in this state. Commits made in detached HEAD state become “orphans” that don’t belong to any branch. Switch to another branch, and those commits become unreachable – eventually garbage collected by Git.
If you accidentally start working in detached HEAD state, immediately create a branch to protect your work:
# Create a new branch at the current commit
$ git switch -c my-new-branchWhen you create a repository, a main branch is created
by default. By convention, main holds “stable code that’s
ready for production.”
New features and bug fixes are developed on branches that split off
from main, then merged back in when complete. This is the
standard workflow.
The Shift from master to main
The default branch used to be called master. Starting
around 2020, GitHub and many other services began migrating to
main.
This change was part of a broader movement in the tech industry to replace terminology with historical connotations of oppression – specifically the “master/slave” metaphor – with more neutral and inclusive language.
New GitHub repositories now default to main, but you’ll
still encounter master in older projects and some
tutorials. Both refer to the same thing – the default branch – so don’t
be confused when you see either one. This book follows the current
standard and uses main.
Branch Strategy in Practice
The word “branch” means “a division or subdivision.” Think of
main as the “trunk” of a tree, with feature
branches and bugfix branches growing out from it as its
limbs.
In professional software development, you’ll almost never work
directly on the main branch. Most companies and teams have
explicit branching rules.
Here are some typical rules: “Direct commits to main are
prohibited. Always create a working branch and merge via pull request
(PR).” “Every PR requires at least one reviewer’s approval.” “CI
(automated tests) must pass before merging.” Rules like these are
standard practice.
Why so strict? In most setups, main is directly
connected to the production environment. A buggy commit on
main means users are affected. That’s why main
is treated as sacred ground, and every change must pass through multiple
checkpoints.
Here’s what the day-to-day flow looks like: Create a branch for your
assigned task (e.g., feature/user-profile). Develop on that
branch. When it’s ready, open a pull request. Your teammates review the
code, and if everything looks good, it’s merged into
main.
Even for solo projects, building this habit is worth it. If you get
used to working directly on main, you’ll struggle when you
join a team. And even solo, maintaining a “working main”
means you always have a deployable state ready to go.

Branches are easier to manage when you follow naming conventions:
| Use Case | Naming Example | Description |
|---|---|---|
| New feature | feature/user-auth |
Developing a new feature |
| Bug fix | bugfix/login-error |
Fixing a bug |
| Experiment | experiment/ai-suggestion |
Trying something experimental |
| Release | release/v1.0 |
Preparing for release |
Using “Experiment Branches” in AI Development
When testing code suggested by AI tools, always create an experiment branch first:
$ git switch -c experiment/copilot-refactorIf it works, merge it into main. If it doesn’t, delete
the branch. This keeps main safe while letting you
aggressively try out AI suggestions.
Branches give you the confidence that “failure is safe” – an essential capability in the age of AI.
Git has a unique mechanism called the “staging area” (also known as the “index”). It’s a concept specific to Git that you won’t find in other version control systems.
The staging area was born from the demands of the Linux kernel – a massive project with hundreds of changes per day. In that environment, developers needed fine-grained control over “which changes go into each commit.”
Without a staging area, you’d have to either commit all changes in your working directory at once or split commits only at the file level. The staging area lets you create commits in “meaningful units.”
Situation: You’ve modified two files, but one is finished and the other is still in progress.
# Check current status
$ git status
Changes not staged for commit:
  modified:   login.js      # <- Done! Ready to commit
  modified:   dashboard.js  # <- Still in progress...

# Stage only login.js
$ git add login.js

# Check status again
$ git status
Changes to be committed:
  modified:   login.js      # <- Staged (will be included in commit)

Changes not staged for commit:
  modified:   dashboard.js  # <- Not staged (will NOT be included)

# Commit
$ git commit -m "Fix login feature"
# -> Only login.js is committed
# -> dashboard.js remains as work in progress
The staging area lets you commit “only the finished parts” without worrying about dragging in unfinished work.
Files managed by Git move through three states:

Working tree: Where you actually edit files. The files open in your editor live here.
Staging area: Where you prepare changes for the
next commit. Use git add to move changes here.
Repository: Where committed changes are
permanently stored. Running git commit records the staging
area’s contents here.
Selective commits: Even if you’ve changed multiple files, you can pick just the related changes for each commit
Partial staging: You can stage specific lines
within a single file (git add -p)
Review opportunity: Before committing, you can
inspect “what am I about to commit?” (git status,
git diff --staged)
Handling interruptions: If an urgent bug fix comes in mid-development, you can set aside your current work and create a separate commit
# 1. Edit files (work in the working tree)
$ code feature.js  # Open and edit in VS Code

# 2. Stage your changes
$ git add feature.js

# 3. Review what's staged
$ git status
Changes to be committed:
  modified:   feature.js

# 4. Commit
$ git commit -m "Add user authentication"git statusgit status is one of the most frequently used Git
commands. Let’s look at how to read its output:
$ git status
On branch main                          # Current branch

Changes to be committed:                # Shown in green
  (use "git restore --staged <file>..." to unstage)
        modified:   completed.js        # -> Will be included in commit

Changes not staged for commit:          # Shown in red
  (use "git add <file>..." to update what will be committed)
        modified:   work-in-progress.js # -> Will NOT be included in commit

Untracked files:                        # Shown in red
  (use "git add <file>..." to include in what will be committed)
        new-file.js                     # -> Not yet tracked by Git
What the three sections mean:
| Section | Color | Meaning |
|---|---|---|
| Changes to be committed | Green | Staged. Will be included in the next git commit |
| Changes not staged | Red | Modified but not staged. Won’t be included in the commit |
| Untracked files | Red | New file. Not yet tracked by Git |
Before every commit, check git status and verify that
“the green section contains exactly the files you intend to commit.”
If You Forget to Stage, Your Changes Won’t Be Committed
In Git, changes are not included in a commit unless you explicitly
stage them with git add. The most common cause of “I
changed it but it’s not in my commit” is forgetting to stage.
Make it a habit to always check git status before
committing. Files shown in green will be committed; files shown in red
will not.
Glossary
| Term | Description |
|---|---|
| Repository | Where a project’s files and change history are stored. The
.git folder is its physical form |
| Local repository | A repository on your own machine. Works offline |
| Remote repository | A repository on a server like GitHub. Used for sharing with a team |
| Commit | A snapshot recording the project’s state. Permanently stored in history |
| Commit hash | A unique ID assigned to each commit (e.g.,
abc1234) |
| Branch | A pointer to a commit. Lightweight – created and deleted instantly |
| HEAD | A pointer showing your current location (branch) |
| main branch | The default branch. Typically holds stable, production-ready code |
| Staging area | Where you prepare changes for a commit. Also called the “index” |
| Working tree | The workspace where you actually edit files |
| add | The operation of moving changes to the staging area
(git add) |
| push | Sending local changes to the remote repository |
| pull | Fetching remote changes to your local repository |
| clone | Copying a remote repository to your local machine |
In this chapter, you learned the core concepts of Git. By understanding the three pillars – repositories, commits, and branches – you should now have a clear mental model of how Git works.
.git folder is its physical
formWhat is a repository?
What is a commit?
What is the main reason for using branches?
What is HEAD?
Which combination correctly describes Git’s three states?
Next chapter preview: In Chapter 3, you’ll set up your development environment – Git, VS Code, and more. Let’s get ready to actually use Git.
Free Downloadable Content for This Book
Five free bonus resources are available to accelerate your learning.

Download URL: https://alphaelements.co.jp/en/books/why-git-vol1/
Passphrase: UnlockGit2026
A passphrase is required to access the download.