What you’ll learn in this chapter
Estimated reading time: 20-30 minutes | Difficulty: ★★☆☆☆
This is the second volume of the “Why Git?” series.
“Why Git?” – why does Git matter in the AI era? With AI tools like GitHub Copilot and Claude Code generating code for us, Git’s importance has only grown. Safely managing AI-generated code, sharing it with a team, and ensuring quality – Git is the foundation that makes all of this possible.
In the Foundations volume (Vol. I), you learned to manage versions on your own. You can create commits, switch branches, and merge changes. If you’re new to Git’s basic commands and concepts, we recommend starting with Vol. I first.
But in real-world development, working alone is the exception. You need to share code with a team. You need multiple people working on the same project simultaneously. You want code reviews to improve quality. For all of these scenarios, local-only Git operations aren’t enough.
In “Why Git? Vol. II: Mastery,” you’ll learn the Git skills that make you effective on a team. Remote repository workflows, conflict resolution, Pull Request-based code reviews, AI tool integration, CI/CD automation – these are practical skills used daily in modern development.
By the end of this book, you’ll be ready to contribute to a professional development team. The uncertainty of “I’m not sure I really understand Git” will become the confidence of “Git? I’ve got that covered.”
YouTube, blogs, Q&A sites – there’s no shortage of free resources for learning Git and AI-powered development. That’s a great thing. But each of these sources has its strengths and limitations.
Video content does a great job of explaining individual topics, but a single video can only cover so much. “How to git push” and “How to resolve conflicts” may each get covered, but how those pieces connect – and the order you use them in a real workflow – remains unclear.
Online articles have the same issue. You can find answers by searching, but the real barrier for beginners is not knowing what to search for in the first place. If you’ve never heard of “parallel AI development with git worktree,” you’ll never think to look it up.
This book aims to connect those scattered pieces into a single, coherent path. How do the commands from Vol. I come alive in team development? Why does conflict resolution matter for AI-driven parallel workflows? Each chapter builds on the previous one, and hands-on exercises let you experience these concepts firsthand – giving you the fastest route to professional-level skills.
Knowledge you’ve picked up from videos and articles will deepen as you read this book. If you find yourself thinking, “So that’s what that command was doing,” then this book has done its job.
By the end of this book, you’ll be able to:
From solo development to team collaboration – this book is your bridge to the next level.
Vol. I: Foundations
| Chapter | Content |
|---|---|
| Chapter 1 | Why Git Matters in the AI Era |
| Chapter 2 | Understanding Git’s Core Concepts |
| Chapter 3 | Setting Up Your Development Environment |
| Chapter 4 | Getting Comfortable with the Terminal |
| Chapter 5 | Git Commands: A Practical Guide |
| Chapter 6 | Hands-On Git Practice in a Local Repository |
| Chapter 7 | Integrating AI Agents with Git |
Vol. II: Mastery (this book)
| Chapter | Content |
|---|---|
| Chapter 1 | Introduction to Vol. II and GitHub Setup |
| Chapter 2 | Working with Remote Repositories |
| Chapter 3 | Development Flow Rules |
| Chapter 4 | Mastering Conflict Resolution |
| Chapter 5 | Integrating AI Tools with Git |
| Chapter 6 | Thriving in Team Development |
| Chapter 7 | Automating with GitHub Actions |
| Chapter 8 | Troubleshooting and Advanced Techniques |
| Chapter 9 | Going Further – Worktrees and Git LFS |
We recommend reading this book from Chapter 1 in order. Each chapter builds on the previous one, so following the sequence will give you the deepest understanding.
That said, if you already have a GitHub account and SSH keys configured, feel free to start at Chapter 2. In that case, just skim the “Prerequisite Review” section in this chapter to make sure you’re up to speed.
Each section heading includes a link back to the table of contents. When you want to review a topic or look up a specific command, you can quickly jump to the right section.
Throughout this book, sections where you’ll be working through exercises are marked with a Hands-On label.
Programming and Git are skills you can’t learn just by reading. Typing commands yourself, watching the screen change, encountering errors and working through them – this cycle is what turns knowledge into real, usable skill.
When you see the Hands-On label, follow along with the same operations. Things might not work perfectly on your first try, and that’s part of the process. When an error appears, read the message carefully and think about what caused it. That experience is what builds the problem-solving ability you’ll rely on in real development.
This book contains many command examples. If the word “command” makes you tense up, take a breath. It’s going to be fine.
You don’t need to memorize anything right now. Every time a command appears, we’ll explain it step by step. The fastest way to learn isn’t memorization – it’s learning by doing.
A terminal (also called a console or command line) is a tool where you type text instructions for your computer. The default terminal varies by operating system.
| OS | Default Terminal | Prompt Symbol |
|---|---|---|
| Mac | Terminal.app (zsh) | % |
| Windows | PowerShell / Command Prompt | > |
| Linux | Various terminals (bash) | $ |
Important note for Windows users: This book assumes you’re using “Git Bash” on Windows. Git Bash is a bash shell that gets installed along with Git, giving you the same commands available on Mac and Linux.
Some commands may not work or may produce different output in PowerShell or Command Prompt. To follow along exactly, use Git Bash.
In this book, terminal operations are displayed in dark background boxes like this:
$ git status
On branch main
nothing to commit, working tree cleanAn important detail in terminal displays is the prompt symbol at the beginning of each line. It varies depending on your environment.
| Environment | Prompt Display |
|---|---|
| Git Bash / Linux | $ |
| Mac (zsh) | % |
| Windows PowerShell | PS C:\> |
| Windows Command Prompt | C:\> |
This book uses $ throughout. If your
environment shows % or >, simply type the
command that appears after the $.
$ git status
On branch main
Lines with $: Commands you type (don’t
type the $ itself) Lines without
$: Output from the computer (the result)
So in the example above, you type git status, and the
computer responds with On branch main.
#) MeanThe # symbol in code indicates a “comment.” Everything
from # to the end of that line is treated
as a comment and ignored by the computer. You don’t need to type it.
# This entire line is a comment (don't type it)
$ git add index.html # <- only this part is a comment#, so the entire
line is a commentgit add index.html is the
command; everything after # is a commentIn the example above, you only type
git add index.html.
In this book, values you need to replace are shown in
<> brackets.
$ git commit -m "<message>"
$ git switch <branch-name>
$ git clone <repository-url>
In the examples above, replace <message> with your
actual message (e.g., "Add new feature"). Don’t type the
<> brackets themselves.
| Notation | Meaning |
|---|---|
$ |
A command you type (don’t type the $) |
# |
A comment (explanation only, don’t type it) |
<value> |
Replace with an actual value |
-x |
Short option |
--option |
Long option |
... |
Output has been truncated |
Mac and Linux Users
On Mac and Linux, the default terminal (zsh or bash) works out of the box. No special setup is needed. All commands in this book will run as-is.
To get the most out of this book, let’s do a quick review of Git’s core concepts. If you’re already comfortable with these, skim through and move on to the next section.
There are four essential concepts you need to know when working with Git.
Repository
A repository is where your project’s files and their change history
are stored. It’s actually a hidden .git folder inside your
project directory, created with the git init command. Once
a repository exists in a folder, Git version control is active
there.
Commit
A commit is a snapshot of your project’s state at a specific point in time. Think of it like a save point in a video game – you can always return to that exact state. When you create a commit, you include a “commit message” describing what changed.
Branch
A branch is a lightweight pointer that marks a point of divergence in
your work. The main branch is the primary line of
development, and you create separate branches for features or bug fixes.
When the work is done, you merge that branch back into
main. Branches let you develop new features without
affecting production code.
Staging Area
The staging area is where you select and prepare changes for your
next commit. You use git add to move changes into the
staging area, then git commit to record them all at once.
This mechanism lets you group related changes into a single, focused
commit.
Let’s review the basic Git commands you’ll be using in this book.
| Command | Description | Example |
|---|---|---|
git init |
Initialize a repository | git init |
git status |
Check current state | git status |
git add |
Stage changes | git add filename |
git commit |
Create a commit | git commit -m "message" |
git log |
View history | git log --oneline |
git branch |
List branches | git branch |
git switch |
Switch branches | git switch branch-name |
git merge |
Merge branches | git merge feature |
If any of these feel unfamiliar, review Chapter 5 of Vol. I (“Git Commands: A Practical Guide”) before continuing. This book assumes familiarity with these basic commands as we move into remote repository workflows and team development.
GitHub is the world’s largest code-sharing platform. Launched in 2008, it now has over 100 million developers as of 2026. We’ll cover the differences between Git and GitHub, and the benefits of using GitHub, in detail in Chapter 2.
If you already have a GitHub account, skip ahead to the next section, “Setting Up SSH Keys.”
A GitHub account is free to create. Follow these steps to get started.
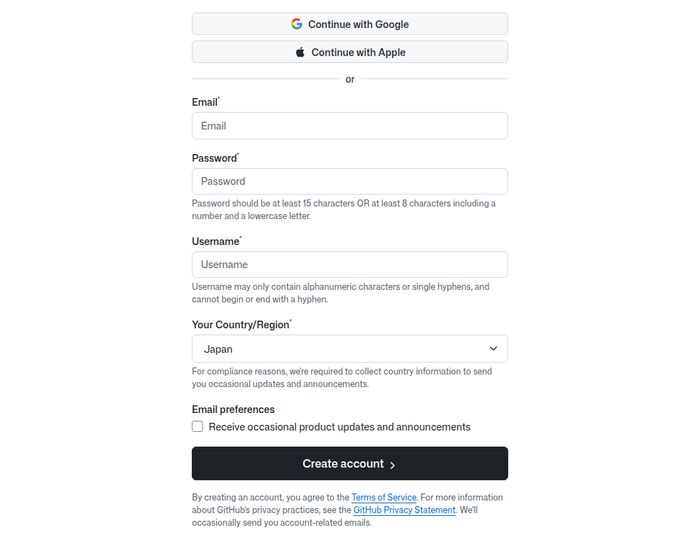
Open https://github.com/signup in your browser. You’ll see a screen like this:
You can also sign up with a Google or Apple account, but here we’ll walk through email registration.
Type your email address in the “Email” field. A confirmation email will be sent here, so use an address you can check right away.
Enter a password in the “Password” field. As shown on the screen, it must meet one of the following criteria:
For security, avoid reusing passwords from other services.
Enter a username in the “Username” field. Allowed characters are:
This username becomes part of your URL
(github.com/username) and appears as your public identity
on GitHub.
Choosing Your Username
You can change your username later, but doing so changes your profile URL. Any links you’ve previously shared will break, so choose carefully from the start.
Employers and recruiters frequently review GitHub profiles, so pick
something professional. A name based on your real name (e.g.,
john-doe) or a memorable handle works well.
Under “Your Country/Region,” select where you live.
The “Email preferences” checkbox controls whether you receive product updates and announcements from GitHub. Leave it unchecked if you’d rather not.
Once all fields are filled in, click the “Create account” button.
A confirmation email will be sent to the address you entered. Open it and enter the verification code, or click the verification link, to complete registration.
That’s it – your GitHub account is ready.
GitHub’s free plan (Free) provides plenty of functionality:
For personal projects and small teams, the free plan is more than sufficient.
Setting up SSH keys enables secure, convenient communication with GitHub. Once configured, you won’t need to enter a password every time you push or pull.
SSH (Secure Shell) is a protocol for secure communication over a network. SSH keys come in pairs:
Think of the private key as the key only you hold, and the public key as the lock on the front door. The lock (public key) can be public – without the matching key (private key), no one can get in.
There are two ways to communicate with GitHub – HTTPS and SSH. This book recommends SSH.
Open your terminal (Git Bash on Windows) and run the following command:
# Generate an SSH key (ed25519 is recommended)
$ ssh-keygen -t ed25519 -C "your_email@example.com"
Generating public/private ed25519 key pair.
Enter file in which to save the key (/Users/username/.ssh/id_ed25519):
# -> Press Enter to accept the default location

Enter passphrase (empty for no passphrase):
# -> Set a passphrase (optional but recommended for added security)

Enter same passphrase again:
# -> Re-enter the same passphrase

Your identification has been saved in /Users/username/.ssh/id_ed25519
Your public key has been saved in /Users/username/.ssh/id_ed25519.pub
Replace your_email@example.com with the email address
you registered with GitHub.
A passphrase is optional but adds an extra layer of security. If you set one, you’ll be prompted for it the first time you use the SSH key.
By default, the key is saved as id_ed25519. You may want
a custom name in situations like these:
To specify a custom name, use the -f option:
# Use -f to specify a custom file path
$ ssh-keygen -t ed25519 -C "your_email@example.com" -f ~/.ssh/id_ed25519_github_personal
Example names: - id_ed25519_github_personal (GitHub
personal) - id_ed25519_github_work (GitHub work) -
id_ed25519_gitlab (GitLab)
If you use a custom name, you’ll need to configure
~/.ssh/config to specify which key to use for which
service. We’ll cover this in the advanced techniques chapter. If this is
your first time, stick with the default name.
Display and copy the contents of your public key:
# Display the public key
$ cat ~/.ssh/id_ed25519.pub
ssh-ed25519 AAAAC3NzaC1lZDI1NTE5AAAAI... your_email@example.com

# You can copy the output manually, or use one of these
# commands to copy directly to your clipboard:

# Mac
$ pbcopy < ~/.ssh/id_ed25519.pub

# Linux (requires xclip)
$ xclip -selection clipboard < ~/.ssh/id_ed25519.pub

# Windows (Git Bash)
$ clip < ~/.ssh/id_ed25519.pub
If you used a custom key name, substitute your file name:
# Example with a custom key name
$ cat ~/.ssh/id_ed25519_github_personal.pub
ssh-ed25519 AAAAC3NzaC1lZDI1NTE5AAAAI... your_email@example.com

# You can copy the output manually, or use one of these
# commands to copy directly to your clipboard:

# Mac
$ pbcopy < ~/.ssh/id_ed25519_github_personal.pub

# Linux
$ xclip -selection clipboard < ~/.ssh/id_ed25519_github_personal.pub

# Windows (Git Bash)
$ clip < ~/.ssh/id_ed25519_github_personal.pub
Copy the entire line starting with ssh-ed25519 and
ending with your email address. Make sure no line breaks are
introduced.
Now register the copied public key with GitHub.
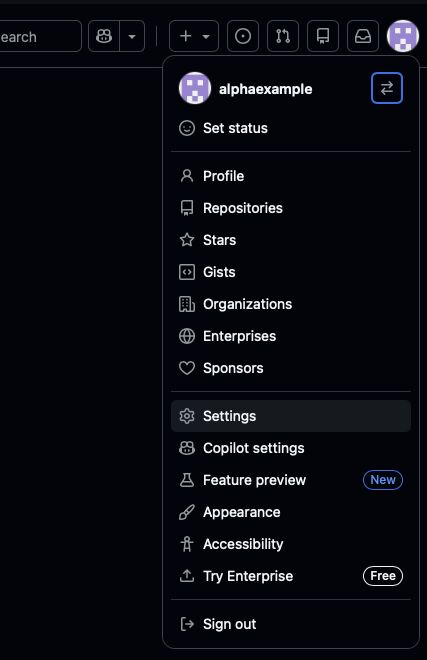
Log in to GitHub and click your profile icon in the top-right corner. Select Settings from the dropdown menu.
Click SSH and GPG keys in the left sidebar. The SSH key management page will appear.

Click the green New SSH key button.
Enter the following information:
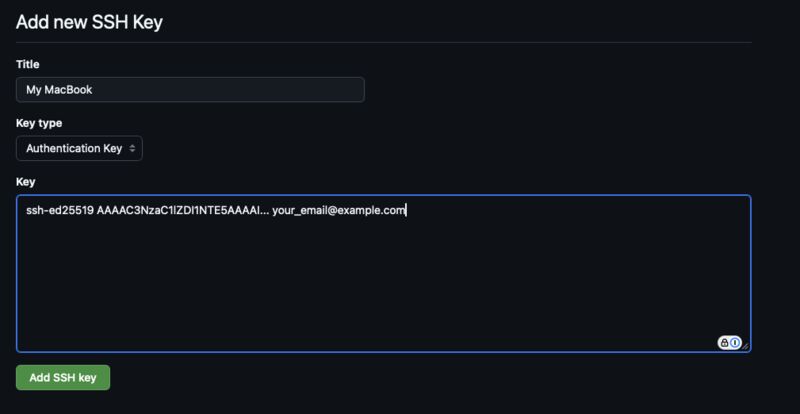
ssh-ed25519)Click the green Add SSH key button to finish. You may be prompted to confirm your GitHub password.
Let’s verify everything is set up correctly.
$ ssh -T git@github.com
The authenticity of host 'github.com (20.27.177.113)' can't be established.
ED25519 key fingerprint is SHA256:+DiY3wvvV6TuJJhbpZisF/zLDA0zPMSvHdkr4UvCOqU.
This key is not known by any other names.
Are you sure you want to continue connecting (yes/no/[fingerprint])? yes
Warning: Permanently added 'github.com' (ED25519) to the list of known hosts.
Hi username! You've successfully authenticated, but GitHub does not provide shell access.
On first connection, you’ll see a fingerprint verification prompt.
Type yes to continue.
If you see “Hi username! You’ve successfully authenticated,” the SSH connection is working. The “GitHub does not provide shell access” part is a normal message – nothing to worry about.
Never Share Your Private Key
~/.ssh/id_ed25519 (without the .pub
extension) is your private key. Never share this file with anyone,
upload it to GitHub, or send it via email.
The only key you should share is the public key
(id_ed25519.pub).
If you suspect your private key has been compromised, immediately generate a new key pair and delete the old public key from GitHub.
Here’s how to handle common SSH connection errors.
“Permission denied (publickey)”
Your public key may not be registered on GitHub, or your private key isn’t being loaded correctly.
# Check if your SSH key is loaded
$ ssh-add -l

# If no keys are listed, add yours
$ ssh-add ~/.ssh/id_ed25519
Port 22 is blocked
Corporate or school networks sometimes block port 22. In that case, configure SSH to connect via port 443 instead.
# Create or edit the ~/.ssh/config file
$ code ~/.ssh/config
Add the following:
Host github.com
  Hostname ssh.github.com
  Port 443
User gitGitHub has a lot of features, but you only need a handful to get started. You’ll learn the rest as you need them throughout this book.
When you log in to GitHub, you’ll see the dashboard (home screen). Here you can find:
A repository page has several tabs. Let’s look at what each one does.
Code Tab
This is the default tab. It displays the repository’s files and folders.
README.md in the
root directory is rendered automaticallyIssues Tab
This is where you manage bug reports and feature requests.
Pull Requests Tab
This is where you propose and review code changes.
We’ll cover Pull Requests in detail in Chapter 6, “Thriving in Team Development.”
Actions Tab
This manages CI/CD (Continuous Integration / Continuous Delivery) workflows.
We’ll cover GitHub Actions in depth in Chapter 7, “Automating with GitHub Actions.”
Settings Tab
Configure repository settings (visible only if you’re the owner or an admin).
Let’s look at the buttons in the top-right area of a repository page.
You Don’t Need to Learn Everything at Once
GitHub has a vast feature set, but you don’t need to know it all upfront. This book introduces features as they become relevant.
For now, just remember two things: “browse code on the repository page” and “get the clone URL from the <> Code button.” That’s enough to get started.
When you clone (copy) a repository to your local machine, you’ll choose between two URL types:
git@github.com:username/repo.githttps://github.com/username/repo.gitSSH vs. HTTPS: Which Should You Use?
SSH requires a one-time key setup but then needs no further authentication – it’s more secure and convenient. HTTPS requires no setup but prompts for a Personal Access Token (PAT) on every push. If you set up SSH keys in the previous section, use the SSH URL.
In this chapter, you got the big picture of what Vol. II covers and completed the setup needed to work with GitHub.
Which SSH key do you register with GitHub?
When the SSH connection test displays “Hi username! You’ve successfully authenticated,” what does it mean?
What is the “Issues” tab on a GitHub repository page used for?
Which statement about Git “branches” is correct?
Next chapter preview: In Chapter 2, you’ll create a repository on GitHub and connect it to a local repository. You’ll learn the fundamentals of remote operations: push, pull, and clone.